Send logs from Laravel to Axiom
This guide explains integrating Axiom as a logging solution in a Laravel application. Using Axiom's capabilities with a custom log channel, you can efficiently send your application's logs to Axiom for storage, analysis, and monitoring. This integration uses Monolog, Laravel's underlying logging library, to create a custom logging handler that forwards logs to Axiom.
Prerequisites
- Create an Axiom account.
- Create a dataset in Axiom where you will send your data.
- Create an API token in Axiom with permissions to query and ingest data.
- PHP development environment
- Composer installed on your system
- Laravel application setup
Installation
Create a Laravel project
Create a new Laravel project:
composer create-project --prefer-dist laravel/laravel laravel-axiom-loggerExploring the logging config file
In your Laravel project, the config directory contains several configurations on how different parts of your application work, such as how it connects to the database, manages sessions, and handles caching. Among these files, logging.php identifies how you can define your application logs activities and errors. This file is designed to let you specify where your logs go: a file, a cloud service, or other destinations. The configuration file below includes the Axiom logging setup.
code config/logging.php<?php
use Monolog\Handler\NullHandler;
use Monolog\Handler\StreamHandler;
use Monolog\Handler\SyslogUdpHandler;
use Monolog\Processor\PsrLogMessageProcessor;
return [
'default' => env('LOG_CHANNEL', 'stack'),
'deprecations' => [
'channel' => env('LOG_DEPRECATIONS_CHANNEL', 'null'),
'trace' => false,
],
'channels' => [
'stack' => [
'driver' => 'stack',
'channels' => ['single'],
'ignore_exceptions' => false,
],
'single' => [
'driver' => 'single',
'path' => storage_path('logs/laravel.log'),
'level' => env('LOG_LEVEL', 'debug'),
'replace_placeholders' => true,
],
'axiom' => [
'driver' => 'monolog',
'handler' => App\Logging\AxiomHandler::class,
'level' => env('LOG_LEVEL', 'debug'),
'with' => [
'apiToken' => env('AXIOM_API_TOKEN'),
'dataset' => env('AXIOM_DATASET'),
],
],
'daily' => [
'driver' => 'daily',
'path' => storage_path('logs/laravel.log'),
'level' => env('LOG_LEVEL', 'debug'),
'days' => 14,
'replace_placeholders' => true,
],
'stderr' => [
'driver' => 'monolog',
'level' => env('LOG_LEVEL', 'debug'),
'handler' => StreamHandler::class,
'formatter' => env('LOG_STDERR_FORMATTER'),
'with' => [
'stream' => 'php://stderr',
],
'processors' => [PsrLogMessageProcessor::class],
],
'syslog' => [
'driver' => 'syslog',
'level' => env('LOG_LEVEL', 'debug'),
'facility' => LOG_USER,
'replace_placeholders' => true,
],
'errorlog' => [
'driver' => 'errorlog',
'level' => env('LOG_LEVEL', 'debug'),
'replace_placeholders' => true,
],
'null' => [
'driver' => 'monolog',
'handler' => NullHandler::class,
],
'emergency' => [
'path' => storage_path('logs/laravel.log'),
],
],
];At the start of the logging.php file in your Laravel project, you'll find some Monolog handlers like NullHandler, StreamHandler, and a few more. This shows that Laravel uses Monolog to help with logging, which means it can do a lot of different things with logs.
Default log channel
The default configuration specifies the primary channel Laravel uses for logging. In our setup, this is set through the .env file with the LOG_CHANNEL variable, which you’ve set to axiom. This means that, by default, log messages will be sent to the Axiom channel, using the custom handler you've defined to send logs to the dataset.
LOG_CHANNEL=axiom
AXIOM_API_TOKEN=$API_TOKEN
AXIOM_DATASET=$DATASET
LOG_LEVEL=debug
LOG_DEPRECATIONS_CHANNEL=null
Deprecations log channel
The deprecations channel is configured to handle logs about deprecated features in PHP and libraries, helping you prepare for updates. By default, it's set to ignore these warnings, but you can adjust this to direct deprecation logs to a specific channel if needed.
'deprecations' => [
        'channel' => env('LOG_DEPRECATIONS_CHANNEL', 'null'),
        'trace' => false,
    ],
Configuration log channel
The heart of the logging.php file lies within the channels array where you define all available logging channels. The configuration highlights channels like single, axiom, and daily, each serving different logging purposes:
'single' => [
            'driver' => 'single',
            'path' => storage_path('logs/laravel.log'),
            'level' => env('LOG_LEVEL', 'debug'),
            'replace_placeholders' => true,
        ],

        'axiom' => [
            'driver' => 'monolog',
            'handler' => App\Logging\AxiomHandler::class,
            'level' => env('LOG_LEVEL', 'debug'),
            'with' => [
                'apiToken' => env('AXIOM_API_TOKEN'),
                'dataset' => env('AXIOM_DATASET'),
            ],
],- Single: Designed for simplicity, the
singlechannel writes logs to a single file. It’s a straightforward solution for tracking logs without needing complex log management strategies. - Axiom: The custom
axiomchannel sends logs to your specified Axiom dataset, providing advanced log management capabilities. This integration enables powerful log analysis and monitoring, supporting better insights into your application's performance and issues. - Daily: This channel rotates logs daily, keeping your log files manageable and making it easier to navigate log entries over time.
Each channel can be customized further, such as adjusting the log level to control the verbosity of logs captured. The LOG_LEVEL environment variable sets this, defaulting to debug for capturing detailed log information.
Getting started with log levels in Laravel
Laravel lets you choose from eight different levels of importance for your log messages, just like a list of warnings from very serious to just for info. Here's what each level means, starting with the most severe:
- EMERGENCY: Your app is broken and needs immediate attention.
- ALERT: similar to
EMERGENCY, but less severe. - CRITICAL: Critical errors within the main parts of your app.
- ERROR: error conditions in your application.
- WARNING: something unusual happened that may need to be addressed later.
- NOTICE: Important info, but not a warning or error.
- INFO: General updates about what your app is doing.
- DEBUG: used to record some debugging messages.
Not every situation fits into one of these levels. For example, in an online store, you might use INFO to log when someone buys something and ERROR if a payment doesn't go through because of a problem.
Here's a simple way to log messages at each level in Laravel:
use Illuminate\Support\Facades\Log;

Log::debug("Checking details.");
Log::info("User logged in.");
Log::notice("User tried a feature.");
Log::warning("Feature might not work as expected.");
Log::error("Feature failed to load.");
Log::critical("Major issue with the app.");
Log::alert("Immediate action needed.");
Log::emergency("The app is down.");
Output:
[2023-09-01 00:00:00] local.DEBUG: Checking details.
[2023-09-01 00:00:00] local.INFO: User logged in.
[2023-09-01 00:00:00] local.NOTICE: User tried a feature.
[2023-09-01 00:00:00] local.WARNING: Feature might not work as expected.
[2023-09-01 00:00:00] local.ERROR: Feature failed to load.
[2023-09-01 00:00:00] local.CRITICAL: Major issue with the app.
[2023-09-01 00:00:00] local.ALERT: Immediate action needed.
[2023-09-01 00:00:00] local.EMERGENCY: The app is down.
Creating the custom logger class
In this section, we will explain how to create the custom logger class designed for sending your Laravel application’s logs to Axiom. This class named AxiomHandler , extends Monolog’s AbstractProcessingHandler giving us a structured way to handle log messages and forward them to Axiom.
- Initializing cURL: The
initializeCurlmethod sets up a cURL handle to communicate with Axiom's API. It prepares the request with the appropriate headers, including the authorization header that uses your Axiom API token and content type set toapplication/json. - Handling errors: If there's an error during the cURL request, it's logged to PHP's error log. This helps in diagnosing issues with log forwarding without disrupting your application's normal operations.
- Formatting logs: Lastly, we specify the log message format using the
getDefaultFormattermethod. By default, we use Monolog'sJsonFormatterto ensure our log messages are JSON encoded, making them easy to parse and analyze in Axiom.
<?php

namespace App\Logging;

use Monolog\Handler\AbstractProcessingHandler;
use Monolog\Logger;
use Monolog\LogRecord;
use Monolog\Formatter\FormatterInterface;

class AxiomHandler extends AbstractProcessingHandler
{
    private $apiToken;
    private $dataset;

    public function __construct($level = Logger::DEBUG, bool $bubble = true, $apiToken = null, $dataset = null)
    {
        parent::__construct($level, $bubble);
        $this->apiToken = $apiToken;
        $this->dataset = $dataset;
    }

    private function initializeCurl(): \CurlHandle
    {
        $endpoint = "https://api.axiom.co/v1/datasets/{$this->dataset}/ingest";
        $ch = curl_init($endpoint);

        curl_setopt($ch, CURLOPT_RETURNTRANSFER, true);
        curl_setopt($ch, CURLOPT_POST, true);
        curl_setopt($ch, CURLOPT_HTTPHEADER, [
            'Authorization: Bearer ' . $this->apiToken,
            'Content-Type: application/json',
        ]);

        return $ch;
    }

    protected function write(LogRecord $record): void
    {
        $ch = $this->initializeCurl();

        $data = [
            'message' => $record->message,
            'context' => $record->context,
            'level' => $record->level->getName(),
            'channel' => $record->channel,
            'extra' => $record->extra,
        ];

        $payload = json_encode([$data]);

        curl_setopt($ch, CURLOPT_POSTFIELDS, $payload);
        curl_exec($ch);
        if (curl_errno($ch)) {
            // Optionally log the curl error to PHP error log
            error_log('Curl error: ' . curl_error($ch));
        }

        curl_close($ch);
    }

    protected function getDefaultFormatter(): FormatterInterface
    {
        return new \Monolog\Formatter\JsonFormatter();
    }
}
Creating the test controller
In this section, we will demonstrate the process of verifying that your custom Axiom logger is properly set up and functioning within your Laravel application. To do this, we’ll create a simple test controller with a method designed to send a log message using the Axiom channel. Following this, we’ll define a route that triggers this logging action, allowing you to easily test the logger by accessing a specific URL in your browser or using a tool like cURL.
Create a new controller called TestController within your app/Http/Controllers directory. In this controller, add a method named logTest . This method will use Laravel’s logging to send a test log message to your Axiom dataset. Here’s how you set it up:
<?php

namespace App\Http\Controllers;

use Illuminate\Http\Request;
use Illuminate\Support\Facades\Log;
use Monolog\Logger;

class TestController extends Controller
{
    public function logTest()
    {

        $customProcessor = function ($record) {

            $record['extra']['customData'] = 'Additional info';

            $record['extra']['userId'] = auth()->check() ? auth()->user()->id : 'guest';

            return $record;
        };

        // Get the Monolog instance for the 'axiom' channel and push the custom processor
        $logger = Log::channel('axiom')->getLogger();
        if ($logger instanceof Logger) {
            $logger->pushProcessor($customProcessor);
        }

        Log::channel('axiom')->debug("Checking details.", ['action' => 'detailCheck', 'status' => 'initiated']);
        Log::channel('axiom')->info("User logged in.", ['user_id' => 'exampleUserId', 'method' => 'standardLogin']);
        Log::channel('axiom')->info("User tried a feature.", ['feature' => 'experimentalFeatureX', 'status' => 'trial']);
        Log::channel('axiom')->warning("Feature might not work as expected.", ['feature' => 'experimentalFeature', 'warning' => 'betaStage']);
        Log::channel('axiom')->warning("Feature failed to load.", ['feature' => 'featureY', 'error_code' => 500]);
        Log::channel('axiom')->error("Major issue with the app.", ['system' => 'paymentProcessing', 'error' => 'serviceUnavailable']);
        Log::channel('axiom')->warning("Immediate action needed.", ['issue' => 'security', 'level' => 'high']);
        Log::channel('axiom')->error("The app is down.", ['system' => 'entireApplication', 'status' => 'offline']);

        return 'Log messages sent to Axiom';
    }
}
This method targets the axiom channel, which we previously configured to forward logs to your Axiom account. The message Testing Axiom logger! should then appear in your Axiom dataset, confirming that the logger is working as expected.
Registering the route
Next, you need to make this test accessible via a web route. Open your routes/web.php file and add a new route that points to the logTest method in your TestController. This enables you to trigger the log message by visiting a specific URL in your web browser.
<?php

use App\Http\Controllers\TestController;

Route::get('/test-log', [TestController::class, 'logTest']);
With this route, navigating to /test-log on your Laravel application's domain will execute the logTest method, send a log message to Axiom, and display 'Log sent to Axiom' as a confirmation in the browser.
Run the app
If you are running the Laravel app locally, to see your custom Axiom logger in action, you'll need to start your Laravel application. Open your terminal or command prompt, navigate to the root directory of your Laravel project, and run the following command:
php artisan serveThis command launches the built-in development server, making your application accessible via a web browser. By default, Laravel serves your application at http://localhost:8000/test-log, but the command output will specify the exact address.
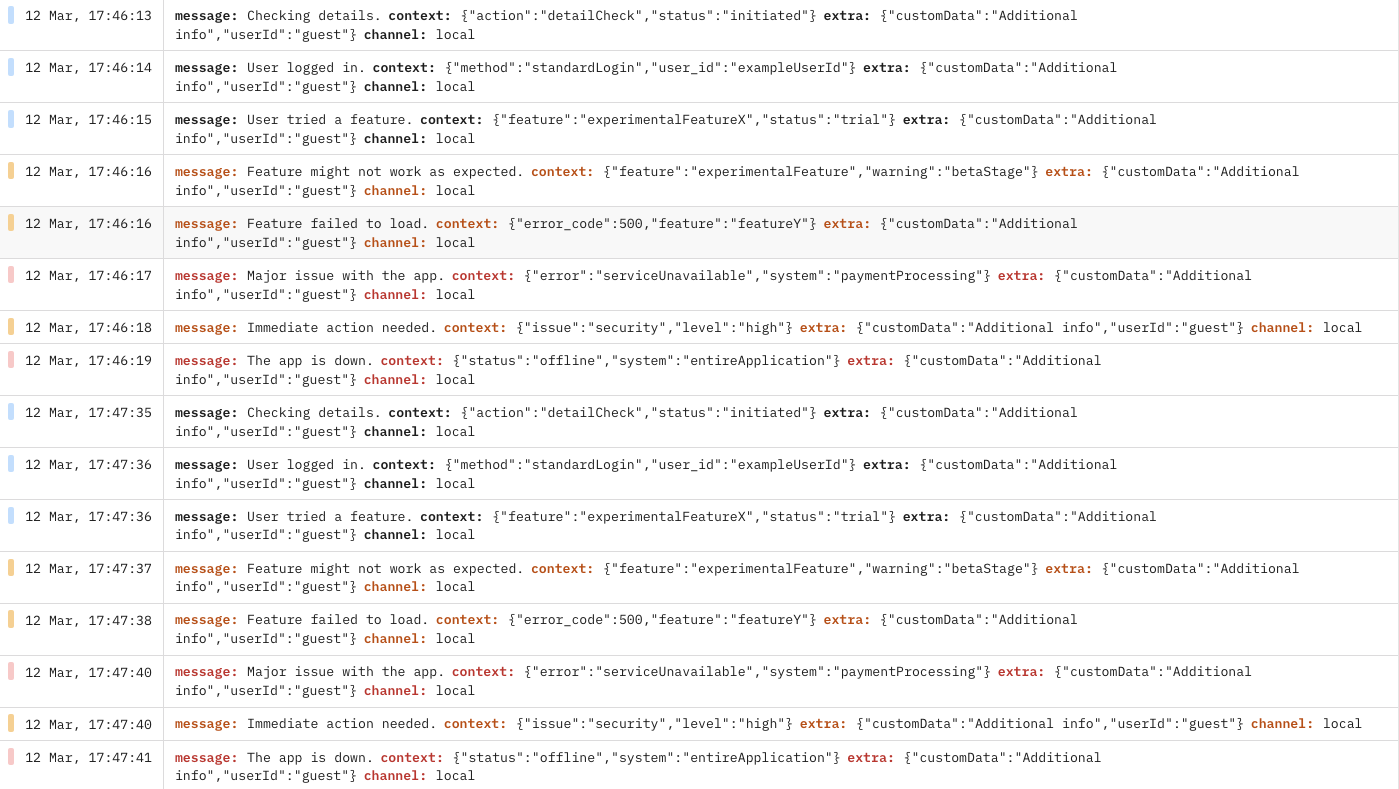
View the logs in Axiom
Once you've set up your Laravel app with Axiom logging and sent test logs via our TestController, check your dataset. There, you'll find your logs categorized by levels like debug, info, error, and warning. This confirms everything is working and showcases Axiom's capabilities in handling log data.
Conclusion
This guide has introduced you to integrating Axiom for logging in Laravel applications. You've learned how to create a custom logger, configure log channels, and understand the significance of log levels. With this knowledge, you're set to track errors and analyze log data effectively using Axiom.